A wardrobe sale — also called a closet sale or vide dressing — is one of the most satisfying ways to give your clothes a second life. The pieces leave your closet, a buyer gets something they'll actually wear, and the whole thing turns a Saturday morning into real, useful income.
The catch: a wardrobe sale only works if it's organized. Sorted properly. Priced honestly. Photographed clearly. Promoted in advance. This guide walks you through every step — whether you're hosting friends in your living room, running a Sunday-night story sale, or doing both at once with a single creator closet link.
Turn this guide into your next drop.
What is a wardrobe sale?
A wardrobe sale is a curated resale of personal clothing, accessories, and shoes — usually run by one person, not a brand. For creators, it often blends pieces worn in content, gifted samples, and lifestyle staples that no longer fit the current wardrobe.
It can happen in two formats, and they're not mutually exclusive:
- IRL — at home, in a courtyard, at a studio, or with friends as a pop-up.
- Online — a single shareable page where followers can browse, save pieces, and submit interest.
The organization work is almost identical for both. Most of what follows applies to either format.
Step 1: Sort your wardrobe properly
Selection is what separates a sale that moves from a sale that sits. Be honest about what's actually wearable and clean — and ruthless about what isn't.
- Go through every section of your closet, plus drawers and storage bins.
- Group by category: tops, dresses, trousers, knits, outerwear, shoes, bags, accessories.
- Pull out anything stained, broken, pilled, or stretched — donate or recycle, don't sell.
- Separate accessories (scarves, belts, jewelry) so they're easier to display and price.
- Set aside a 'maybe' pile and revisit it the next day with fresh eyes.
If you wouldn't buy it back at the price you're about to charge, leave it out.
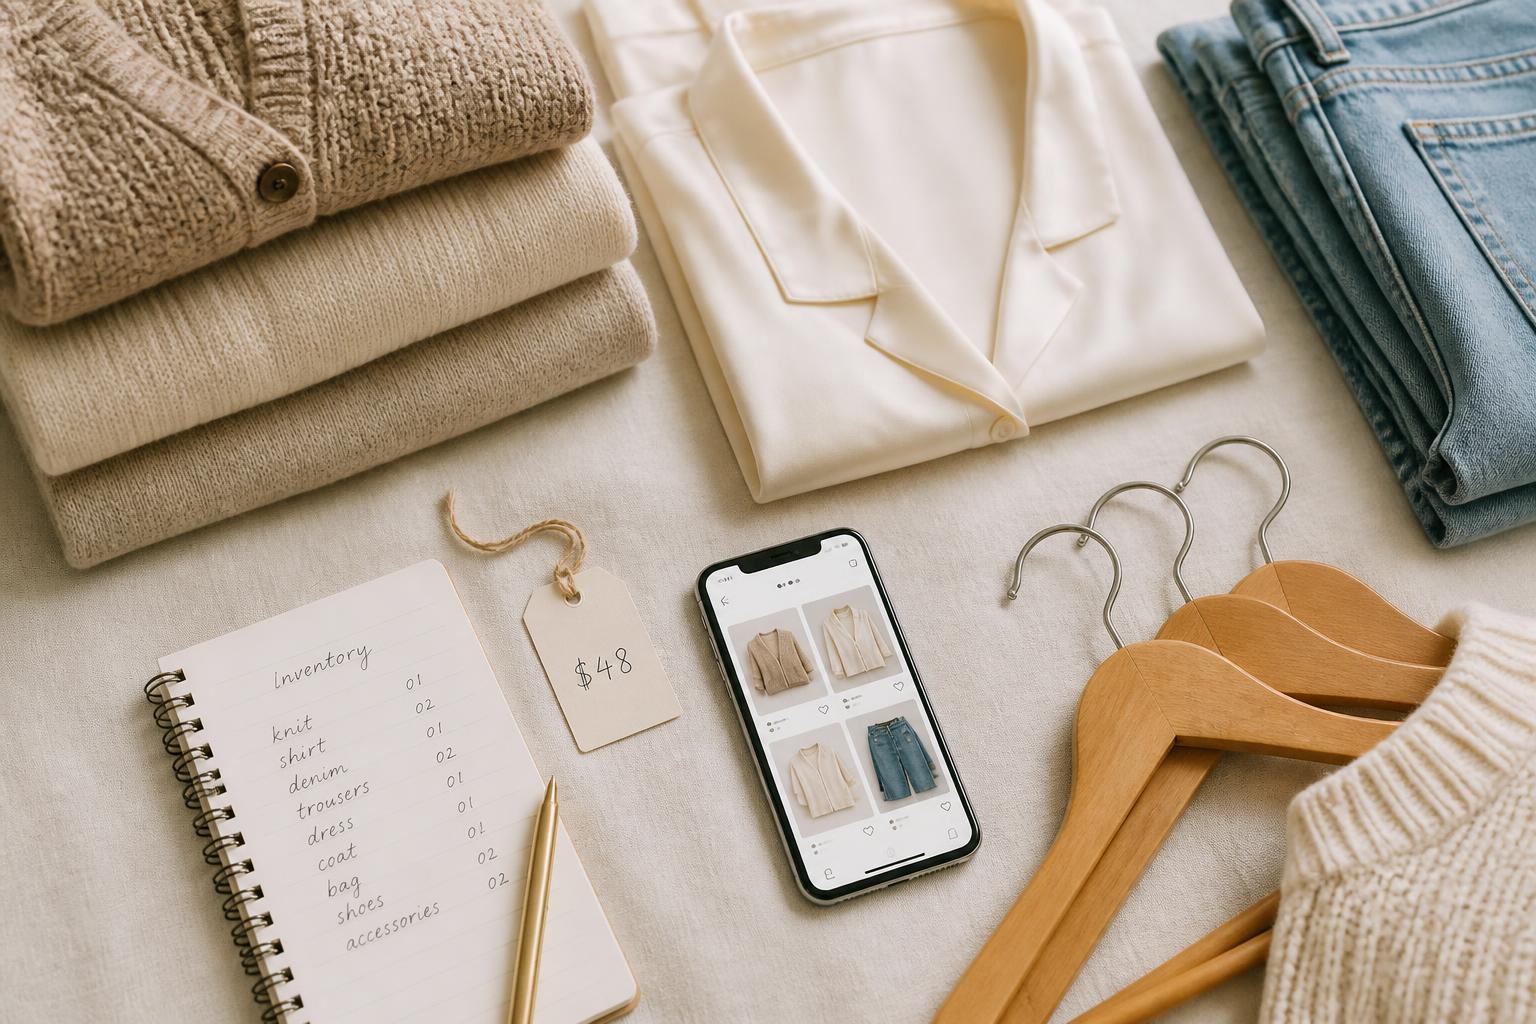
Step 2: Build a simple inventory
An inventory is the difference between a real wardrobe sale and a chaotic clean-out. It doesn't need to be fancy — a notebook or a spreadsheet works. For each piece, capture brand, size, condition, original price (if known), your asking price, and a quick note (worn once, gifted, has a small mark on the hem).
This list becomes the backbone of everything else: pricing, photographing, listing, restocking the rail, and answering buyer questions on the day.
Step 3: Price your pieces
Pricing is where most first-time sellers either give items away or scare buyers off. A simple, honest framework:
| Condition | Suggested price range |
|---|---|
| New with tags | 40–60% of retail |
| Worn 1–2 times, like new | 30–45% of retail |
| Lightly used, no flaws | 20–35% of retail |
| Visible wear or repaired | 10–20% of retail |
| Designer / collectible | Research recent resale comps |
- Price in clean, simple numbers (€20, €35, €50) — easier to remember and pay.
- Build in a small margin for friendly negotiation IRL.
- For story sales, lock the price — late buyers asking for a discount slow everything down.
- Bundle slow-moving small items into 'three for X' offers.
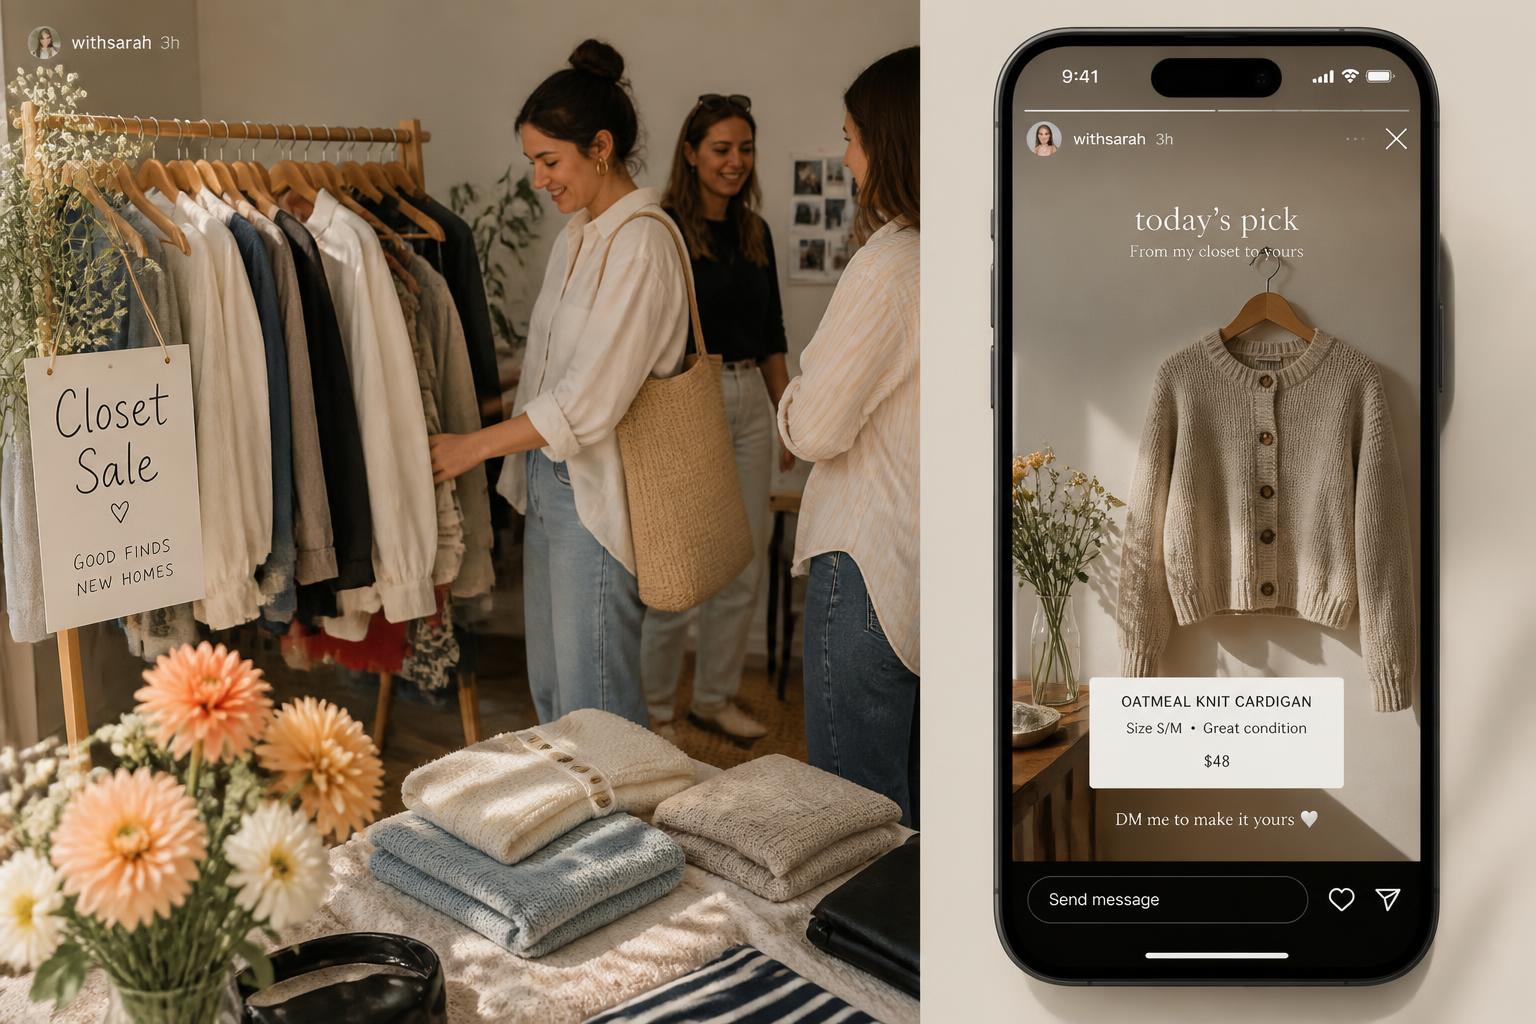
Step 4: Photograph each piece (yes, even for IRL)
Even an in-person wardrobe sale benefits from photos — for the Instagram teaser, the WhatsApp group invite, and the leftover pieces that didn't sell. For an online sale, photos are everything.
- Shoot in soft, natural daylight near a window.
- Use a clean, neutral background — a white wall, a linen sheet, a wooden floor.
- Take 2–3 angles: full piece, close-up of fabric, any flaw or label.
- Keep crops and styling consistent so the whole sale feels cohesive.
If you don't want to write each listing from scratch, Loovly's AI-assisted listing drafts can turn a single photo into a starting product description with title, suggested category, and material notes. You edit, you don't author — which is how the photography step turns into actual listings.
Step 5: Promote the sale in advance
Quiet wardrobe sales aren't a pricing problem. They're a promotion problem. Start at least one week out.
- Post a teaser story showing the rail, a flatlay, or a fitting room mirror shot.
- Send a personal message to the 10–20 friends most likely to actually come or shop.
- Share the date, time, location (or link), and any access info upfront.
- For IRL: leave clear signage at the entrance — building number, floor, door code if needed.
- For online: pin the closet link in your bio and stories, not just a single post.
- Use a drop-style countdown so people understand the sale is time-bound.
If you're using a Loovly creator closet, you only have to share one link. New drops, restocks, and updates live at the same URL, so followers don't lose track between stories.
Step 6: Precautions before the day
A bit of friction-prevention up front saves the day itself.
- Tell your neighbours if you're hosting at home — extra foot traffic is easier when expected.
- Lock away anything not for sale: documents, electronics, personal items, valuables.
- Decide your payment methods in advance and post them clearly.
- Have a friend on hand to help with bags, change, and the door.
- Have a plan for unsold pieces — donation bag, store box, or list them online the same week.
Step 7: Presentation on the day
A tidy presentation does more for sales than a discount sign. Group pieces in a way that makes browsing intuitive.
- By size — easiest for shoppers who already know what they wear.
- By category — tops together, dresses together, shoes lined up.
- By price — a clear 'everything €10' rack moves volume.
- By color story — works beautifully for visual content.
Use a real clothing rack rather than a bed if possible. Keep prices visible on every piece — clipped tags or stickers — so buyers don't have to ask.
Step 8: The wardrobe sale equipment checklist
What you actually need on the day:
- A clothing rack and matching hangers (wood or velvet looks the most premium).
- Price tags, clips, and a marker.
- Float of small bills and coins for change, in a zipped pouch.
- Payment QR codes printed and visible (bank transfer, PayPal, Revolut, etc.).
- Bags for buyers — paper bags or reused dust bags.
- A small mirror if you don't have one in the room.
- Water, snacks, a playlist — it's a long day.
- Your phone, charged, with the inventory list open.
Step 9: Run the online version (or both at once)
Even creators who love an IRL sale increasingly run an online version in parallel — the audience is just bigger online. The workflow:
- Photograph and list every piece in advance, drawing from the same inventory.
- Publish them on a single closet page with a stable, shareable link.
- Open buyer interest so followers can tap pieces and tell you they're serious.
- Follow up with serious buyers, arrange the next step, and mark pieces as reserved.
- Anything that doesn't sell IRL stays online — no relisting, no rework.
Loovly is built for exactly this workflow. Each item becomes a real product page with photos, story, and a buyer-interest button. Followers can save pieces, follow your closet, get drop alerts, and share specific items. Eligible Creator Business users can also enable external payment links on individual products — those payments are handled outside Loovly by the payment provider you choose.
Step 10: After the sale
The hour after the sale matters more than people think.
- Reconcile the inventory: what sold, what didn't, what's reserved.
- Update online listings — mark sold pieces, drop prices on slow movers.
- Pack and ship online orders within 48 hours.
- Donate or recycle anything that didn't move.
- Save a short note on what worked: best-selling category, best promo channel, best price point.
That note is your starting point for the next wardrobe sale. Each round gets faster, calmer, and more profitable.
Loovly wardrobe sale checklist
- Sorted, cleaned, and condition-checked all pieces.
- Built a simple inventory with brand, size, condition, price.
- Priced honestly using the condition table.
- Photographed each piece in natural light against a clean background.
- Published the closet on a single shareable link.
- Promoted at least one week in advance across stories, posts, and DMs.
- Prepared payments, bags, hangers, and the equipment list.
- Decided in advance where unsold pieces go.
Turn this guide into your next drop.
Frequently asked questions
How much can a wardrobe sale realistically make?⌄
It depends entirely on the brands, condition, sizes, and audience. A small home sale with 40–60 well-priced pieces can move a meaningful amount of inventory in an afternoon, but no one can guarantee a specific number — and you should be wary of anyone who does.
Do I need a permit to host a wardrobe sale at home?⌄
In most places, an occasional private wardrobe sale at home doesn't require a permit, but rules vary by country, city, and frequency. If you sell regularly or commercially, check your local rules — and your building rules if you rent.
What's the best way to run a wardrobe sale online?⌄
Use a single creator closet page with a shareable link so followers can browse all pieces in one place, save what they like, and submit buyer interest. Don't run the whole thing from DMs — pieces get sold twice and inquiries get buried.
Can I sell gifted or PR pieces?⌄
Usually yes, as long as the brand agreement doesn't forbid it and you're transparent about the item's condition. Many creators sell lightly used gifted pieces as part of their wardrobe sale.
What if pieces don't sell?⌄
Leave them on your online closet, lower the price the following week, bundle slow movers, and donate or recycle whatever still hasn't moved after a month.
Ready to host your own closet sale?
Set up your free Loovly closet in minutes — one link, real measurements, and a checkout your audience can actually use.